RACECAR Tutorial [ICRA '19]
May 24, 2019 Montreal, Canada
Wall Follow Lab (Hardware)
It’s time to use the actual racecar! In this lab you will be taking the wall following code that you ran in simulation and running it on the car. You will also be building a safety controller to prevent your racecar from crashing into obstacles.
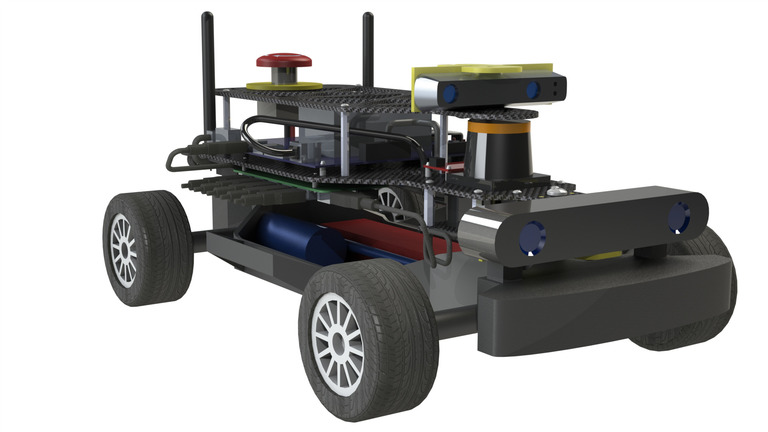
Part 1: Review Hardware
The racecar platform is exciting and fast but it is not a toy. The hardware we have on board is extremely expensive and it is your responsibility to keep it in good condition for future classes. The racecar can survive a couple light bumps but if it goes flying into a wall it can be destroyed. The whole frame can split in half, the lidar can get scratched, the TX2 can get damaged, etc. Any one of these repairs can cost hundreds if not thousands of dollars in addition to the dozens of hours repair time.
If your car develops hardware issues for any reason, please tell an instrutor immediately and we will do our best to repair it. Over the course of a full semester, most teams will probably have some sort of hardware issue and it is typically not a big deal. That being said, do not exhibit obviously reckless behavior!
Before continuing, please review a full breakdown of the hardware here.
Part 2: Wall Following
Use scp or git clone to get one of your team members’ wall following
code from the simulated lab onto the car.
Just like in the simulated lab the wall follower should live in the src folder of your
workspace, ~/racecar_ws/src/[WALL_FOLLOWER_CODE].
catkin_make in the root of your workspace to rebuild it and then
source ~/racecar_ws/devel/setup.bash.
Before running the wall_follower change the drive_topic param to
/vesc/ackermann_cmd_mux/input/navigation. See the
muxes section below for more
details. Get the car into a safe location and make sure teleop is running.
In another terminal launch
roslaunch wall_follower wall_follower.launch
Hopefully this will work without any changes! To activate the wall follower, hold down the right bumper on the joystick If necessary, tune the parameters in the wall follower so that it works well in real life. Combine ideas from multiple team members’ implementations of the wall follower to make a more robust controller.
Consider how to quantify how well a controller performs, and techniques to improve controller performance.
Some reasons it may not be working
- The number of lidar beams is different than in the simulator
- The field of view is different than in the simulator.
- If you have a velodyne car, the lidar is not pointed forwards, it is rotated by 60 degrees.
Part 3: Safety Controller
Now that you’ve got your wall follower working we want you to build a safety controller. In future labs the racecar will be moving at high speeds so we need you to build a system that protects it from crashes.
Create a new package for your safety controller (place it
in ~/racecar_ws/src).
Your goal is to make a node in this pacakge that prevents the racecar from
crashing into obstacles.
We want you to be able to demonstrate that your safety controller is robust. You should be able to attempt to crash the racecar in a variety of scenarios and have the safety controller prevent the crashes. You should also be able to walk in front of the racecar without it running into you.
At the same time your racecar should not be “scared”. You should still be able to drive close to walls, turn around corners, go fast etc. without the racecar freezing in its tracks. You will be required to run your safety controller in all future labs so don’t cripple yourself with something overprotective.
Please be careful when you are testing. Always have your joystick ready to stop the racecar and start very slow.
Muxes
The racecar has a command mux with different levels of priority that you will need in building your safety controller.

The navigation topic you have been publishing to is an alias for the highest priority navigation topic in the mux (defined here):
/vesc/ackermann_cmd_mux/input/navigation -> /vesc/high_level/ackermann_cmd_mux/input/nav_0
For brevity we will refer to
/vesc/high_level/ackermann_cmd_mux/input/nav_i as .../nav_i in this
handout (this doesn’t work on the actual racecar).
Driving commands sent to .../nav_0 override driving commands sent to
.../nav_1, .../nav_2, etc.
Likewise driving commands sent to .../nav_1 override driving commands sent
to .../nav_2, .../nav_3, etc.
You can use this structure to layer levels of control.
For example, a robot whose job it is to explore randomly and collect minerals as
it finds them could use 2 muxes.
The controller that explores randomly could publish to a lower priority topic
like .../nav_1.
Whenever the vision system detects minerals, it could begin to publish commands
to a higher priority topic like .../nav_0. .../nav_0 would override
.../nav_1 until the minerals have been depleted and commands stopped being
published to.../nav_0.
The navigation command with the highest priority is then published to
/vesc/high_level/ackermann_cmd_mux/output. This topic is then piped to
/vesc/low_level/ackermann_cmd_mux/input/navigation and fed into another
mux with the following priorities (from highest to lowest):
/vesc/low_level/ackermann_cmd_mux/input/teleop
/vesc/low_level/ackermann_cmd_mux/input/safety
/vesc/low_level/ackermann_cmd_mux/input/navigation
.../teleop is the topic that the joystick publishes to.
This will always have the highest priority.
.../safety has the next highest priority. It will override anything
published to .../navigation. This is where your safety controller will
publish.
So for your safety controller this means:
- Subscribe to
/vesc/high_level/ackermann_cmd_mux/outputto intercept the driving command that is being published. - Subscribe to sensors like
/scan. - Publish to
/vesc/low_level/ackermann_cmd_mux/input/safetyif the command being published to the navigation topic is in danger of crashing the racecar.